 Photo by
 Language is a core component of the human condition. According to the Washington Post, at least 50% of the world’s population is bilingual. That’s a fantastic statistic, that means every second user to our application could be bilingual. Sadly, most app implementations do not support multiple languages and could be missing serving an audience.
In this post, we’ll be covering the quick steps necessary to localize an ASP.NET Core application to target multiple cultures.
Set Up RequestLocalizationMiddleware
Like most new cross-cutting functionality in ASP.NET Core, localization is a feature implemented using middleware. And like most middleware implementations, there are two essential steps we need to take to enable this feature: configuring the service, and then adding it to our ASP.NET Core pipeline.
Let’s first look at what we need to register the configuration for request localization.
// This method gets called by the runtime. Use this method to add services to the container.
public void ConfigureServices(IServiceCollection services)
{
    // 1.
    services
        .AddRazorPages()
        .AddViewLocalization();

    // 2.
    services.AddLocalization(options =>
    {
        options.ResourcesPath = "Resources";
    });

    // 3.
services.Configure<RequestLocalizationOptions>(options =>
{
    options.SetDefaultCulture("en-Us");
    var cultures = new[] {"en-US", "de-DE", "ja-JP"};
    options.AddSupportedCultures(cultures);
    options.AddSupportedUICultures(cultures);
    options.FallBackToParentUICultures = true;
});
}
The first step is to add the services required by the middleware. In our case, we’ll be localizing Razor Pages. To do that, we need to make a call to AddViewLocalization. This call registers a few services we’ll be using later in our view. Here is the internal implementation of the method.
services.TryAdd(ServiceDescriptor.Singleton<IHtmlLocalizerFactory, HtmlLocalizerFactory>());
services.TryAdd(ServiceDescriptor.Transient(typeof(IHtmlLocalizer<>), typeof(HtmlLocalizer<>)));
services.TryAdd(ServiceDescriptor.Transient<IViewLocalizer, ViewLocalizer>());
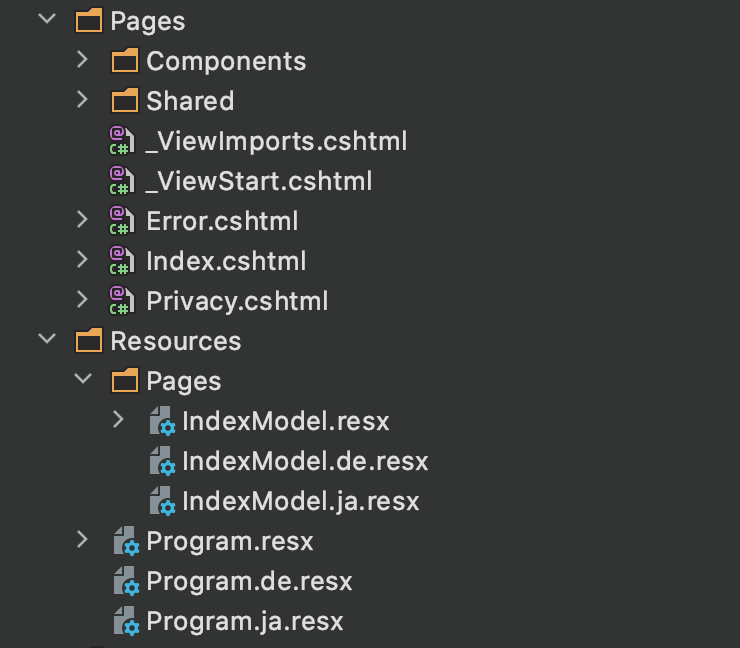
The second step tells the localization middleware where to start looking for resx files. In our case, we’ll be creating a folder named Resources under our project structure.
The localization services work by using the namespace of a class to determine the resource file location. We’ll get more into this later when we start localizing values in our views. For now, here is a screenshot showing the layout of the project.
The third and final step in ConfigureServices is configuring our options and the supported cultures. In our case, we’ll be support German, English, and Japanese. An important note about the difference between CurrentCulture and CurrentCultureUI. CurrentCulture is utilized to localize system types like dates and currency, while the user interface uses ‘CurrentCultureUI`, which in our case is the Razor view engine.
In the Configure method, we need to register our middleware somewhere in our pipeline before our call to UseEndpoints. The registration of this middleware is dependant on the applications other middleware, which means developers will need to adjust according to their apps.
If we need to access the request’s culture in our middleware implementations, we’ll need to register this middleware before our custom middleware.
For clarity, I’ve included the full Configure method call below.
public void Configure(IApplicationBuilder app, IWebHostEnvironment env)
{
    if (env.IsDevelopment())
    {
        app.UseDeveloperExceptionPage();
    }
    else
    {
        app.UseExceptionHandler("/Error");
        // The default HSTS value is 30 days. You may want to change this for production scenarios, see https://aka.ms/aspnetcore-hsts.
        app.UseHsts();
    }

    app.UseHttpsRedirection();
    app.UseStaticFiles();
    // add request localization middleware
    app.UseRequestLocalization();

    app.UseRouting();
    app.UseAuthorization();

    app.UseEndpoints(endpoints => { endpoints.MapRazorPages(); });
}
Resources Search Strategy
The IStringLocalizer<T> interface is a fascinating interface. It uses the namespace of type T to determine the name of a resource file.
If our application has a type WebApplication.Pages.IndexModel, then a request for IStringLocalizer<WebApplication.Pages.IndexModel> will look for a resource instance under the folder prefix we set up in ConfigureServices concatenated with our namespace. In this case, it would look for a resource with the namespace WebApplication.Resources.Pages.IndexModel.
Here is the project structure we saw in the previous section.
The naming approach is merely conventional, and the type of T could be anything. In our sample, we also have a resource for IStringLocalizer<Program>, which will hold all of our global string values.
If we were to use IViewLocalizer, the naming and placement of our resource files would become more critical.
The default implementation of
IViewLocalizerfinds the resource file based on the view’s file name. –Microsoft
In my opinion, the IViewLocalizer implementation is a friendly approach to enforcing conventions but is also limiting as it excludes access to global shared resource files. Using IStringLocalizer and IHtmlLocalizer provide more flexibility.
Using The Localizers
The localizers are services and, like other services, can be accessed using ASP.NET Core’s dependency injection container.
@page
@using Microsoft.Extensions.Localization
@using Microsoft.AspNetCore.Mvc.Localization
@model IndexModel

@inject IStringLocalizer<IndexModel> Localizer
@inject IHtmlLocalizer<IndexModel> HtmlLocalizer

@{
    ViewData["Title"] = "Home page";
}

<div class="text-center">
    <h1 class="display-4">@Localizer["Welcome"]</h1>
    <p>
        @HtmlLocalizer["Learn"]
    </p>
</div>
In this example, we are utilizing two interfaces, IStringLocalizer and IHtmlLocalizer, with each accessing the resource files associated with IndexModel.resx.
A recommendation from reading the documentation is that keys also be the fallback value. Take the following example.
<div>This is awesome!</div>
The Microsoft documentation recommends the following usage of IStringLocalizer.
<div>@Localizer["This is awesome!"]</div>
The localizer implementation will return the key in a LocalizedString type. As developers, we can still develop an app in our native tongue while sewing the seeds for localization.
Switching Cultures
Localization doesn’t work unless our application understands how to switch cultures. The RequestLocalizationMiddleware has three default mechanisms for changing between cultures:
-
QueryStringRequestCultureProvider- looks for aculture=query string value. -
CookieRequestCultureProvider- looks for a.AspNetCore.Culturewith a culture value. -
AcceptHeadersRequestCultureProvider- looks for aAccept-Languageheader in incoming HTTP requests.
These mechanisms are configurable using the RequestLocalizationOptions registered in ConfigureServices. We won’t be going into detail on how to configure the providers, but knowing its possible is worth mentioning.
In the next section, you’ll see how we can utilize the QueryStringRequestCultureProvider to switch between cultures.
The Localization Demo
Putting all these pieces together, we should have a functioning, localized web application. Here’s what it looks like:

For folks who want to play around with this code sample, it is available on a GitHub repository.
Our culture picker is a simple HTML form that submit when ever the value changes.
@model WebApplication.ViewComponents.CulturePickerModel

<div>
    <form method="GET">
        <div class="form-group">
            <label class="sr-only" for="culture-picker">
                Culture
            </label>
            <select
                id="culture-picker"
                class="form-control"
                name="culture"
                onchange="this.parentElement.parentElement.submit();">
                @foreach (var culture in Model.SupportedCultures)
                {
                    <option
                        value="@culture.Name"
                        selected="@(Model.CurrentUICulture.Name == culture.Name)">
                        <span>@Model.ToFlagEmoji(culture.Name)</span> @culture.DisplayName - @culture.NativeName
                    </option>
                }
            </select>
        </div>
    </form>
</div>
We also use a neat Unicode trick to display the culture’s country flag using the later part of the culture name. For example, the culture of ja-JP would yield a country code of JP.
public string ToFlagEmoji(string country)
{
    country = country
        .Split('-')
        .LastOrDefault();

    if (country == null)
        return "⁉️️";

    return string.Concat(
        country
        .ToUpper()
        .Select(x => char.ConvertFromUtf32(x + 0x1F1A5))
    );
}
Conclusion
Localization may seem scary, but the ASP.NET team has taken significant care to make it a manageable problem. Tools like JetBrains Rider with its localization manager make editing values quick and efficient. The internet has made it possible to localize our apps with the help of language experts to correct local idioms. When it comes to localization in ASP.NET, once we understand how the pieces fit together, its just a matter of rinse and repeat.
I want to point you to some great resources that helped me learn more about localization.
- Mike Brind - https://www.mikesdotnetting.com/article/346/using-resource-files-in-razor-pages-localisation
- .NET Core tutorials - https://dotnetcoretutorials.com/2017/06/22/request-culture-asp-net-core/
- Microsoft Documentation - https://docs.microsoft.com/en-us/aspnet/core/fundamentals/localization?view=aspnetcore-3.1
- Alan Edwardes - https://alanedwardes.com/blog/posts/country-code-to-flag-emoji-csharp/


