An essential part of building web applications is understanding what elements may look like in an evolving user interface. For most users, the web is a visual medium with complex components that include many images. This trend has accelerated since the introduction of broadband in more regions worldwide. Who doesn’t love a pretty-looking picture on a website? That said, when you first start building your applications, image assets might be far and few between and may not be essential to the structure of your web application.
In this short post, we’ll see how to use ImageSharp.Web and ASP.NET Core to build a local placeholder image service to help you prototype an expanding UI component library.
Placeholder Images and Why Not A Service?
Placeholder images help you fill out the structure of an HTML component. If you’ve seen any HTML component library, such as Bootstrap, you’re likely familiar with some of the components requiring an image element. The most notable is the card component, where an image is at the top of the component, followed by a title, subtitle, and content.

These components don’t look right until you have an image placed in them, so what is one to do? Well, in most cases, you’d likely reach for an image placeholder service. Here are a few:
Easy enough, right? A few drawbacks should make you cautious about using these third-party services.
- These services can have intermittent issues that cause your layout to break.
- Slow transfer speeds of placeholder images can make your app seem slow to clients. In some scenarios, slow images can pause the rendering of your page until the client has fully downloaded the image.
- You could be sending cookie data to an unknown third party.
Issue 2 is particularly problematic if you’re doing automated testing or have performance alerts for page rendering times. These warnings can lead you to spend hours looking for performance bottlenecks in your code when the issue is with these placeholder services.
Let’s Write A Local Image Placeholder Service
Luckily for you, there’s an effortless way of creating a local placeholder image service with ASP.NET Core and ImageSharp.Web. But before we get to code, you’ll need an abstract image that can be stretched and resized without affecting the image’s content. In my case, I’ve created one in my favorite image editor. Feel free to use it.

Ok, let’s get to some code.
In a new ASP.NET Core project, you’ll want to add the following NuGet dependency of SixLabors.ImageSharp.Web.
Once you’ve installed the package, you’ll want to set up the ASP.NET Core pipeline. First, you’ll register the ImageSharp services, then add the middleware to your application’s request pipeline.
It’s important that you register ImageSharp middleware before the static file middleware, or else ASP.NET Core won’t process images from your static folders properly. Next, let’s create a specialized tag helper to make adding placeholder images more straightforward in our Razor views.
At this point, you should create a folder named img under your wwwroot folder and add the placeholder image there.
Finally, let’s add our tag helper to our _ViewImports.cshtml so we can reference the new tag in all of our Razor views. Be sure to adjust the namespace to match your particular project’s namespace.
Let’s use the placeholder tag in some Razor views.
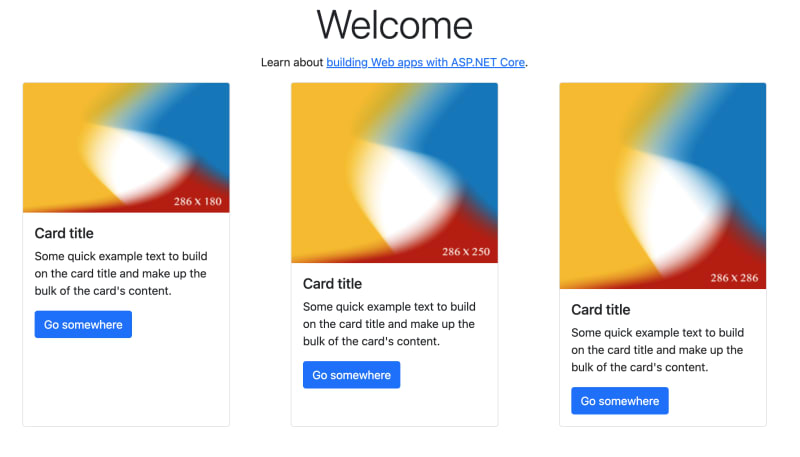
Cool! Let’s also see what it looks like rendered.

If you look at the developer tools at the bottom of the screenshot, you’ll notice that each image is rendered precisely for the use case it is applied within. You also have the added benefit of caching each image, so your app stays more performant as more images are processed. Finally, all images are processed and served locally, so you can accurately represent the performance of your application profile.
Adding The Dimensions To The Image
While not completely necessary, adding the dimensions of your placeholder image can help debug layout issues faster than without them. Luckily, ImageSharp.Web has an extensible command pipeline that you can use to your advantage.
The first step is to create a DimensionsWatermarkProcessor class. This will give us an opportunity to add additional context to our original placeholder image. Before pasting this class into your project you’ll need a few additional packages in your project: SixLabors.Fonts and SixLabors.ImageSHarp.Drawing.
Now, you’ll need to create a DimensionsWatermarkProcessor class. Thanks to Adam Russel for the watermark blog post. You can modify the below code to load custom fonts, change sizes of the dimensions, and the location. For this use case, I felt having the values in the bottom-right were fine.
Once you have the watermark processor in your project, you’ll need to add the processor to the ImageSharp middleware pipeline. Back in your Program.cs file, you’ll need to call AddProcessor.
Finally, let’s update the PlaceholderTagHelper implementation to include the additional dim command that the DimensionsWatermarkProcessor expects. Note, you could modify the value of dim to allow for configurability of the watermark.
Let’s see what the updated placeholders look like now.

Conclusion
I hope you enjoyed this short post. As you can see, with a few bits of code, you can create a local placeholder service designed specifically for your needs. Suppose you want to go the extra mile. In that case, you can explore the ImageSharp APIs and develop processors to generate custom images and watermarks to help uniquely identify image placeholders.
Again, thank you for reading, and I hope you share this post with friends and colleagues. Also, remember to follow me on Twitter at @buhakmeh for more #dotnet news and discussions.

 Photo by


