 Photo by
 Coming from a web development background, I find that HTTP has suited most of my client/server communication needs reliably. Honestly, I generally don’t think too deeply about the protocol when working with ASP.NET. While HTTP is a robust protocol, transmitting data over a TCP connection comes with overhead costs. HTTP needs to be flexible enough to support the potential for multiple client/server interactions and the abundance of file formats that could be transmitted.
In controlled scenarios, we can forgo the ceremony of a flexible protocol like HTTP and go one layer lower, down to TCP. At this level, we’ll be dealing with bytes. Some might choose to deal with bytes exclusively, but it is essential to select a serialization format for security and correctness reasons.
We’ll see how to create a TCP server/client chat application while communicating between them using the Bebop serialization format.
What is Bebop
Bebop is a new schema-based binary serialization technology with support for multiple platforms and technology stacks. As of writing this post, Bebop has cross-platform schema compilers for .NET and Node. The project aims to provide the fastest and most efficient serialization approach for developers, with the initial blog post almost doubling the performance of Google’s ProtoBuff.
Creators at Rainway describe how they can achieve the kind of performance profile described in the post.
That speed and safety comes from the Bebop compiler, which turns schemas describing data structures into tightly optimized “encode” and “decode” methods. The generated code is type-safe in languages that support it, and invoking it is dead simple.
Developers define their messages using the Bebop schema syntax, after which they compile language-specific serialization and deserialization code. The schema syntax follows similar C based languages while offering multiple supported types. Let’s take a look at an example.
[opcode(0x12345678)]
message ChatMessage {
    // awesome
    /* this seems to work */
    1 -> string text;
}

message NetworkMessage {
    1 -> uint64 incomingOpCode;
    2 -> byte[] incomingRecord;
}
We have two messages that we can transmit over a TCP connection. The NetworkMessage is a wrapper for any other message-type we want to send. As we’ll see later in the C# example, the Bebop library supports handling messages by type and OpCode.
The Bebop compiler takes the schema and defines class-based serializers. To utilize these type-serializers, we can access each class individually using the following C# code.
var bytes = ChatMessage
	.Encode(new ChatMessage { Text = "Hello" });

var message = ChatMessage.Decode(bytes);

Console.WriteLine(message.Text);
The schema language specification supports many options, and developers can read about it at the official documentation site.
Let’s look at building a fast and efficient TCP chat client and server solution that communicates using Bebop.
The Bebop Solution Structure
When building a low-level server, we have two choices of communication: TCP or UDP. Luckily, we’ll be using a NuGet package that supports both. To get started, let’s create a brand new solution with three projects: Client, Server, and Contracts.
The Client and Server projects should be console applications, while the Contracts project can be a class library. Next, let’s turn our console applications into a TCP-enabled client/server duo. First, let’s install the NetCoreServer NuGet package.
dotnet add package NetCoreServer
Now, let’s install the Bebop package to all of our projects.
dotnet add package bebop
Finally, we need to enable the Contracts project the ability to compile our Bebop files. We start by adding the bebop-tools package to the Contracts project.
dotnet add package bebop-tools
We also need to modify our .csproj file to include a new ItemGroup element.
<ItemGroup>
    <Bebop Include="**/*.bop"
           OutputDir="./Models/"
           OutputFile="Records.g.cs"
           Namespace="Cowboy.Contracts" />
</ItemGroup>
We now have a solution ready to build on; let’s start with the Contracts project.
Bebop Contracts
As explained in a previous section, Bebop is schema-based. By constraining communication, we can optimize for serialization efficiency and security. In our project, let’s create a new file called ChatMessage.bop. We’ll place the following schema in the file.
[opcode(0x12345678)]
message ChatMessage {
    // awesome
    /* this seems to work */
    1 -> string text;
}

message NetworkMessage {
    1 -> uint64 incomingOpCode;
    2 -> byte[] incomingRecord;
}
When we build our project, we should see a newly generated C# file with our type serializers for NetworkMessage and ChatMessage. For brevity, we’ll exclude the generated code from this article. Now we’re ready to start setting up our Server project.
Bebop Server App
We’ll need to add a reference to our Contracts project before proceeding. The first step is to create a ChatServer class. The ChatServer will use NetCoreServer to handle incoming connections and messages.
using System;
using System.Net;
using System.Net.Sockets;
using NetCoreServer;

namespace Server
{
    public class ChatServer : TcpServer
    {
        public ChatServer(IPAddress address, int port) : base(address, port) {}

        protected override TcpSession CreateSession()
            => new ChatSession(this);

        protected override void OnError(SocketError error)
        {
            Console.WriteLine($"Chat TCP server caught an error with code {error}");
        }
    }
}
NetCoreServer operates on the concept of sessions, so we’ll need to create a new ChatSession class that will be performing most of the logic of our chat server.
using System;
using System.Linq;
using System.Net.Sockets;
using Bebop.Runtime;
using Cowboy.Contracts;
using NetCoreServer;

namespace Server
{
    public class ChatSession : TcpSession
    {
        public ChatSession(TcpServer server) : base(server) {}

        protected override void OnConnected()
        {
            Console.WriteLine($"Chat TCP session with Id {Id} connected!");

            // Send invite message
            var message = "Hello from TCP chat! Please send a message or '!' to disconnect the client!";
            SendAsync(message);
        }

        protected override void OnDisconnected()
        {
            Console.WriteLine($"Chat TCP session with Id {Id} disconnected!");
        }

        protected override void OnReceived(byte[] buffer, long offset, long size)
        {
            var message = NetworkMessage.Decode(buffer);

            BebopMirror.HandleRecord(
                message.IncomingRecord.ToArray(),
                (uint)message.IncomingOpCode.GetValueOrDefault(),
                this
            );
        }

        protected override void OnError(SocketError error)
        {
            Console.WriteLine($"Chat TCP session caught an error with code {error}");
        }
    }
}
We can see essential event handlers that include connecting, disconnecting, erroring, and our ability to receive messages.
Bebop ships with an internal handler system. For this example, I switched between using and not using the Bebop handlers. Folks should decide which approach works best for them. In this example, we will be using a ChatMessageHandler, and we can see the utilization of the BebopMirror class and the OpCode property from our NetworkMessage. In our case, we’re using NetworkMessage as a wrapper for future message types in case we need to route different requests through the same connection. Let’s look at our handler implementation.
using System;
using System.Threading.Tasks;
using Bebop.Attributes;
using Bebop.Runtime;
using Cowboy.Contracts;

namespace Server
{
    [RecordHandler]
    public static class ChatMessageHandler
    {
        [BindRecord(typeof(BebopRecord<ChatMessage>))]
        public static Task HandleChatMessage(object state, ChatMessage message)
        {
            var session = (ChatSession) state;

            Console.WriteLine("Incoming: " + message.Text);

            // Multicast message to all connected sessions
            var response = ChatMessage.Encode(new ChatMessage {Text =$"Server says {message.Text}" });
            session.Server.Multicast(response);

            // If the buffer starts with '!' the disconnect the current session
            if (message.Text == "!")
                session.Disconnect();

            return Task.CompletedTask;
        }
    }
}
We can see that our handler gets the ChatSession passed as the state parameter. The ChatSession allows us to communicate to all connected clients. We don’t use the NetworkMessage wrapper in the handler, but we could if we chose to.
Finally, let’s update our Program file to start the chat server.
using System;
using System.Net;
using Server;

// TCP server port
int port = 1111;
if (args.Length > 0)
    port = int.Parse(args[0]);

Console.WriteLine($"TCP server port: {port}\n");

// Create a new TCP chat server
var server = new ChatServer(IPAddress.Any, port);

// Start the server
Console.Write("Server starting...");
server.Start();
Console.WriteLine("Done!");
Console.WriteLine("Press Enter to stop the server or '!' to restart the server...");

// Perform text input
for (;;)
{
    string line = Console.ReadLine();
    if (string.IsNullOrEmpty(line))
        break;

    // Restart the server
    if (line == "!")
    {
        Console.Write("Server restarting...");
        server.Restart();
        Console.WriteLine("Done!");
        continue;
    }

    // Multicast admin message to all sessions
    line = "(admin) " + line;
    server.Multicast(line);
}

// Stop the server
Console.Write("Server stopping...");
server.Stop();
Console.WriteLine("Done!");
The chat server will start listening on port 1111 for any clients. Let’s write that client now.
Bebop Client App
This project needs a reference to the Contracts project as well. Our first step is to write a client handler class. NetCoreServer ships with a TcpClient base class. We’ll want to inherit from this class and implement our event handlers.
using System;
using System.Net.Sockets;
using System.Threading;
using Cowboy.Contracts;
using TcpClient = NetCoreServer.TcpClient;

namespace Client
{
    class ChatClient : TcpClient
    {
        public ChatClient(string address, int port) : base(address, port) {}

        public void DisconnectAndStop()
        {
            stop = true;
            DisconnectAsync();
            while (IsConnected)
                Thread.Yield();
        }

        protected override void OnConnected()
        {
            Console.WriteLine($"Chat TCP client connected a new session with Id {Id}");
        }

        protected override void OnDisconnected()
        {
            Console.WriteLine($"Chat TCP client disconnected a session with Id {Id}");

            // Wait for a while...
            Thread.Sleep(1000);

            // Try to connect again
            if (!stop)
                ConnectAsync();
        }

        protected override void OnReceived(byte[] buffer, long offset, long size)
        {
            var record = ChatMessage.Decode(buffer);
            Console.WriteLine(record.Text);
        }

        protected override void OnError(SocketError error)
        {
            Console.WriteLine($"Chat TCP client caught an error with code {error}");
        }

        private bool stop;
    }
}
As we can see in the code, we are utilizing the ChatMessage serializer directly. Wrapping our message in NetworkMessage or using ChatMessage work. That said, we need to correctly pair both the client and server to the message type we have chosen.
Finally, let’s update the Client project’s Program.
using System;
using Client;
using Cowboy.Contracts;

// TCP server address
string address = "127.0.0.1";
if (args.Length > 0)
    address = args[0];

// TCP server port
int port = 1111;
if (args.Length > 1)
    port = int.Parse(args[1]);

Console.WriteLine($"TCP server address: {address}");
Console.WriteLine($"TCP server port: {port}");

Console.WriteLine();

// Create a new TCP chat client
var client = new ChatClient(address, port);

// Connect the client
Console.Write("Client connecting...");
client.ConnectAsync();
Console.WriteLine("Done!");

Console.WriteLine("Press Enter to stop the client or '!' to reconnect the client...");

// Perform text input
for (;;)
{
    string line = Console.ReadLine();
    if (string.IsNullOrEmpty(line))
        break;

    // Disconnect the client
    if (line == "!")
    {
        Console.Write("Client disconnecting...");
        client.DisconnectAsync();
        Console.WriteLine("Done!");
        continue;
    }

    // Send the entered text to the chat server
    var message = NetworkMessage.Encode(new NetworkMessage {
        IncomingOpCode = BaseChatMessage.OpCode,
        IncomingRecord= ChatMessage.EncodeAsImmutable(
            new ChatMessage { Text = line }
        )
    });

    client.SendAsync(message);
}

// Disconnect the client
Console.Write("Client disconnecting...");
client.DisconnectAndStop();
Console.WriteLine("Done!");
That’s it! We’ve successfully built a client/server chat application that can communicate using Bebop!
Running The Sample
We first start the Server application, which starts listening on port 1111 for any client. At this point, we can run any number of Client projects.
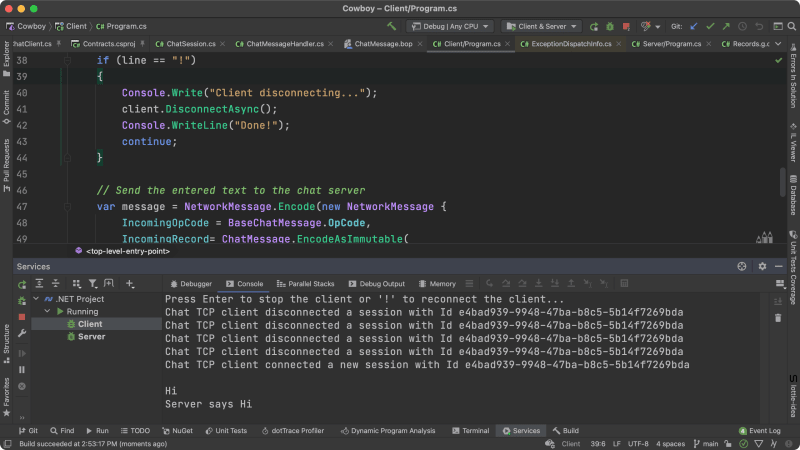
Here we can see the protocol working as intended. Awesome right!
Conclusion
Bebop is a schema-based serialization technology that makes writing TCP/UDP based solutions more efficient and secure. As you saw in this example, it doesn’t take much to build a working sample, and with bebop-tools, .NET developers should find the development time experience seamless. Bebop also supports JavaScript, so users of TypeScript or vanilla JavaScript should have no problem building polyglot-stack solutions.
To access this complete solution, head over to my GitHub repository, and try it out.
I hope you found this post interesting.


