 Photo by
 Class diagrams can help you and your development team better understand the relationship of your domain models, especially as your application’s scope grows to meet the needs of your customers. In the long term, diagrams can also help you formulate a plan for refactoring and organizing a code base. Finally, who doesn’t love a good diagram?
In this post, we’ll see how to use a community PlantUML generator alongside a JetBrains Rider PlantUML plug-in to generate a diagram programmatically and display them in the editor.
What Is PlantUML?
The Unified Modeling Language, most commonly referred to as UML, is a language designed to help you specify, visualize, and document the models found in your software systems. This language is human-readable but also can be processed into visualizations that you can use in meetings, documentation, and tutorials.
PlantUML software allows you to document and draw UML diagrams using simple and human-readable text descriptions. Not only that, it’s free for use and has an extensive community of plug-ins regardless of your IDE choice.
Using PlantUML, you can design several diagrams, including sequence diagrams, object diagrams, timing diagrams, and many more. For software developers, object and class diagrams help you document your codebase and what we’ll be looking at in this post.
JetBrains IDE Plant-UML Plug-in
Before we jump into configuring your project, you’ll need to download the PlantUML plug-in first. You can find the download link for PlantUML integration here. or by searching for “PlantUML integration” in your IDE’s plug-ins window.
As an optional step, I recommend reading this blog post from JetBrain’s official blog titled “Create UML diagrams using PlantUML”. written by Rachel Appel.
macOS Users Need GraphViz Installed
Before setting up your .NET project, macOS users should first install GraphViz. Graphviz is open-source graph visualization software used by PlantUML to draw diagrams. This step is only necessary for PlantUML user’s on macOS, but if you find that the PlantUML plug-in is not visualizing the graphs correctly, you likely missed this step.
The first step is to run the following command in the terminal, assuming you have HomeBrew installed, but what macOS user doesn’t?
brew install graphviz
Now that you have Graphviz installed, you’ll need to update the PlantUML Plug-in settings to point to the dot file. JetBrains Rider uses the dot file to generate diagrams.
JetBrains Rider PlantUML Settings
Open JetBrains Rider’s settings, and go to the PlantUML section under Languages & Frameworks. In the settings, add the following value of /usr/local/Cellar/graphviz/5.0.0/bin/dot to the “Graphviz dot executable” textbox, ensuring the version number of Graphviz matches the one you installed.
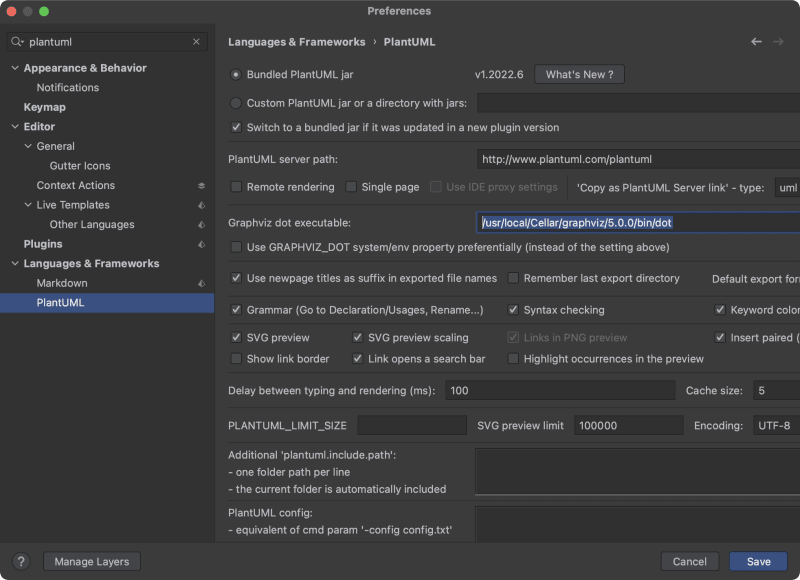
While in the preferences tab, I also recommend checking the boxes of SVG preview and SVG Preview Scaling. Finally, increase the value of SVG Preview Limit to something like 100000. The increased preview limit will make sure images are rendered nice and sharp. If you find your previews are blurry, you likely have set your preview limit set too low.
PlantUML Generator for .NET Solution
The next step is to set up your .NET solution to use the CLI tool PlantUmlClassDiagramGenerator. First, I recommend creating a local tool manifest. You can create a manifest by running the following command.
dotnet new tool-manifest
Once you’ve created the manifest, you’ll want to install the .NET CLI tool locally using the following command.
dotnet tool install PlantUmlClassDiagramGenerator --version 1.2.4
Now we’re ready to start generating some diagrams.
Generating Your First Diagram
I’ll use my project HTMX.NET for this example, but the techniques described here on out will apply to any .NET Solution.
The command we want to run is the following. I’ll do my best to break down each component.
dotnet puml-gen ./src ./puml -dir -public -createAssociation
First, since puml-gen is a local tool, you must invoke it through the dotnet command. You can leave dotnet off if you install the tool globally.
The next portion, ./src ./puml -dir is the input path, followed by the output path. The -dir flag informs the command line tool that the input and output are directories. You could also choose to run puml-gen on individual files, but I find scanning directories much more effective. It’s imperative to remember the -dir flag.
Finally, the -public -createAssociation flags tell puml-gen to only include public classes in our object graph, and to be sure to include any associated classes in the visualization.
You can run these commands through JetBrains Rider’s terminal or as an MSBUILD target, but I prefer to use Rider’s run configurations.
Create a new Shell Script run configuration with the Script text radio button selected and add the previous command into the Script text textbox. Also, ensure the working directory is the root of your solution.

You can now run the command, but there’s one additional step I recommend you take.
Excluding Files From Diagrams
Looking through the source code of the PlantUML Generator tool, I found that you can include a .pumlexclude file at the root of your source directory. The tool will load all lines from this file and allow you to exclude specific files from being processed as part of your diagram.
For HTMX.NET, I excluded several folders and files that added noise to my diagram. As you can also see, you can exclude specific files as well. Just be sure to remember that the paths are relative to your input path.
Htmx/bin/
Htmx/obj/
Htmx.TagHelpers/bin/
Htmx.TagHelpers/obj/
Htmx.TagHelpers/JetBrains.Annotations.cs
It’s common for obj folders to include generated C# files that may or may not be important to your diagram, so choose your exclusion list wisely. Your worst case scenario might be to include every excluded file by name, but it’s not really as bad as it might seem at first.
Important note: The tool has a bug that will load blank lines into your exclusion list, effectively skipping ALL files. Ensure there are no blank lines, or you’ll be left scratching your head. I’ve already submitted a PR to fix this issue.
Pretty PlantUML Diagrams in JetBrains Rider
If you’ve reached this point, you likely want to see some diagrams. So let’s look at HTMX.NET’s class diagram. After running your command, you’ll want to open the include.puml file found at the root of your brand new puml folder. The include.puml file includes all classes generated by the tool. You can also open individual .puml files, and see those diagrams separately.
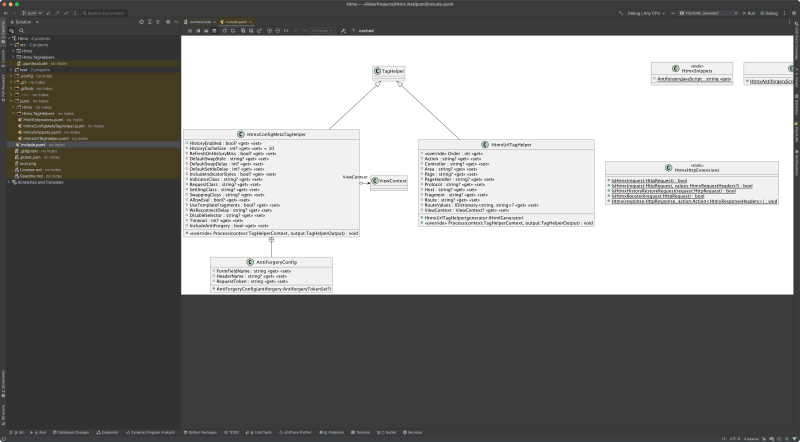
The great thing about JetBrains Rider’s integration is you can save these previews as SVGs and use them in documentation or presentations. Additionally, they are SVGs, so you can even target them with CSS styling or programmatically show and hide elements. After that, the sky is the limit.
Conclusion
There you have it. You now have a robust class diagram generator all within JetBrains Rider. Rider’s strengths have always been its ability to run different processes and create a seamless experience between command line utilities and the UI.
While this tutorial has many steps, they should be easy to follow and replicate in your solutions. Additionally, with the PlantUML generator being a .NET CLI tool, you could generate updated diagrams in your CI pipeline and use them outside your IDE. That’s awesome!
I hope you enjoyed this post, and please remember to share it with your friends and colleagues. Also, if you have any thoughts or questions, please follow me on Twitter at @buhakmeh.


