Photo by
 🎄 Part of the C# Advent Calendar event!🎅🤶
When documentation is excellent, it can help folks quickly and efficiently adopt an open-source software (OSS) project. When it’s inadequate or non-existent, it can hurry even the best projects’ demise. Sadly, there is no one-size-fits-all solution when it comes to writing documentation for a project. Even when documentation exists, the process of keeping coding samples up to date and relevant can be as daunting as writing the initial documentation.
In this post, we’ll explore using MarkdownSnippets in an existing .NET Core project hosted on GitHub. We’ll also utilize the library features to keep both the readme.md files and the documentation up to date. We’ll also explore adding a live-template to JetBrains Rider to make working with snippets easier. When complete, we should have a documentation system that stays in sync with our code.
Getting Started
This post assumes you have .NET installed on your development environment. If you don’t, you can get the latest version of .NET at the official site.
To get started, let’s create a brand new console application. For this article, we don’t need anything complex. From our favorite terminal, we can type the following. It can also be helpful to run git init to initialize our project at a Git project.
> dotnet new console -o happy-docs-sample
> cd ./happy-docs-sample
> git init
Next, we’ll create a local tool manifest and install MarkdownSnippets.Tool.
> dotnet new tool-manifest
> dotnet tool install MarkdownSnippets.Tool
Finally, let’s add the configuration file mdsnippets.json to the root of our project directory, which is necessary for MarkdownSnippets to work correctly. We’ll explain these settings a little later.
{
    "$schema": "https://raw.githubusercontent.com/SimonCropp/MarkdownSnippets/master/schema.json",
    "Convention": "InPlaceOverwrite",
    "WriteHeader": false,
    "LinkFormat": "GitHub",
    "DocumentExtensions": [ "md" ]
}
Finally, let’s create a starting readme.md at the root of the project.
> echo "#Hello World" > readme.md
We should be able to run the mdsnippets tool from the command-line now. Let’s try it.
> dotnet mdsnippets
We should see the following output if we’ve set up everything correctly.
Config:
    RootDir: /Users/khalidabuhakmeh/Projects/Dotnet/hds-test
    ReadOnly:
    WriteHeader: False
    Header:
    UrlPrefix:
    LinkFormat: GitHub
    Convention: InPlaceOverwrite
    TocLevel: 2
    MaxWidth: 2147483647
    ValidateContent: False
    TreatMissingAsWarning: False
    FileConfigPath: /Users/khalidabuhakmeh/Projects/Dotnet/happy-docs-sample/mdsnippets.json (exists:True)
    DocumentExtensions:
        md
Added 1 markdown files
Searching 3 files for snippets
Added 0 snippets
Added 0 .include files
Added 0 files for snippets
Added 0 snippets
Processing /Users/khalidabuhakmeh/Projects/Dotnet/happy-docs-sample/readme.md
In the next section, we’ll create some C# samples to go into our readme.md file and our documentation site.
Creating Code Samples
Very often, our code is ahead of our documentation. With the MarkdownSnippets tool installed, we have a chance to keep our documentation in-step with our project. We still need to add a few more files, which we’ll take advantage of soon.
-
License.txtat the root. I chose the MIT license. - a
/docsfolder with anindex.mdand a_config.ymlfile specifying the theme GitHub pages.
theme: minima
Now, let’s write some code which we’ll inject into our documentation. To do this, we need to take advantage of the //begin-snippet comment in our code. For this example, I’ve written a calculator and surrounded several code-blocks with comments. Note: this code is using top-level statements, a C# 9 feature.
using System;

//begin-snippet: new-calculator
var calculator = new Calculator();
// end-snippet

int result;

//begin-snippet: add-example
result = calculator.Add(1, 1);
// result is 2
Console.WriteLine(result);
// end-snippet

//begin-snippet: minus-example
result = calculator.Minus(1, 1);
// result is 0
Console.WriteLine(result);
// end-snippet

//begin-snippet: multiply-example
result = calculator.Multiply(2, 2);
// result is 4
Console.WriteLine(result);
// end-snippet

//begin-snippet: divide-example
result = calculator.Divide(4, 2);
// result is 2
Console.WriteLine(result);
// end-snippet

//begin-snippet: calculator-interface
public interface ICalculator
{
    int Add(int x, int y);
    int Minus(int x, int y);
    int Multiply(int x, int y);
    int Divide(int x, int y);
}
// end-snippet

class Calculator : ICalculator
{
    public int Add(int x, int y)
    {
        return x + y;
    }

    public int Minus(int x, int y)
    {
        return x - y;
    }

    public int Multiply(int x, int y)
    {
        return x * y;
    }

    public int Divide(int x, int y)
    {
        return x / y;
    }
}
Notice how we define each snippet with a beginning and an end comment. We also need to note the names of each snippet after the : character. Now, let’s write our documentation.
Writing Documentation
Markdown is the backbone of most modern documentation systems. It is easy to learn and infinitely flexible. It is no wonder markdown is the number one choice for the OSS documentation. Projects that adopt markdown will also help user’s contribute to keeping documentation relevant.
MarkdownSnippets has two ways to process snippets into markdown files: SourceTransform and InPlaceOverwrite. The InPlaceOverwrite feature will update our markdown files directly with defined snippets. It is the recommended approach because it keeps the number of files we need to manage low.
Under our /docs folder, let’s modify our index.md with some content. We’ll notice the use of the keyword snippet: <name>. MarkdownSnippets will process all instances and add our snippets in lew of the placeholders.
This is an example of using the [Markdown Snippets](https://github.com/SimonCropp/MarkdownSnippets) global tool to keep code samples up to date.

## Calculator

The `Calculator` class allows us to do basic arithmetic.

snippet: calculator-interface

We can new up a new calculator using the following code.

snippet: new-calculator

### Add

We can add two `int` parameters together.

snippet: add-example

### Minus

We can subtract an `int` parameter from another.

snippet: minus-example

### Multiply

We can multiply `int` parameters together.

snippet: multiply-example

### Divide

We can divide an `int` numerator against an `int` denominator.

snippet: divide-example
Great, let’s copy the same content to our readme.md file. We’ll be using the second important keyword of include. In our readme.md, let’s add some content.
# Happy Docs Sample

include: docs/index.md

## License

include: LICENSE.txt
That’s it! We can now run the mdsnippets command and generate our documentation.
> dotnet mdsnippets
We should see our markdown files enrich our files with snippets and documentation. Here is an example of a snippet from our index.md file.
<!-- snippet: calculator-interface -->
<a id='8d733fd1'></a>
'''cs
public interface ICalculator
{
    int Add(int x, int y);
    int Minus(int x, int y);
    int Multiply(int x, int y);
    int Divide(int x, int y);
}
'''
<sup><a href='/Program.cs#L34-L42' title='Snippet source file'>snippet source</a> | <a href='#8d733fd1' title='Start of snippet'>anchor</a></sup>
<!-- endSnippet -->
Note how MarkdownSnippets added additional HTML to help our OSS users access the snippet’s exact placement in our repository. MarkdownSnippets supports other VCS as well and is not only limited to GitHub.
GitHub Pages
To take advantage of our new documentation, we need to set up GitHub Pages on our target repository. After pushing our repo to GitHub, we can go into the settings of our repository and enable GitHub Pages.
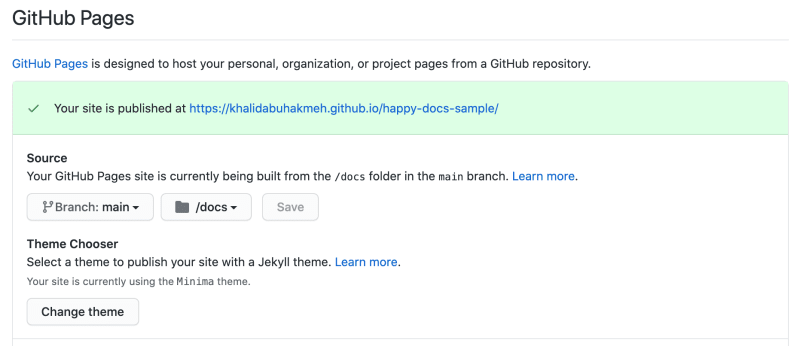
We need to ensure that our GitHub is serving our documentation from the main branch and is targeting the docs directory. Once deployed, we can visit our GitHub Pages documentation site.

The snippet source link allows us to navigate to the exact place in our repository where the snippet originated, and the anchor link allows us to share the code snippet with other developers. These links are configurable based on our versioning source control system.
JetBrains Rider Users
For JetBrains Rider, users can add live templates to our IDE to make surrounding code-blocks much more efficient.
The first step is to create a new live template under Preferences > Editor > Live Templates > C#.
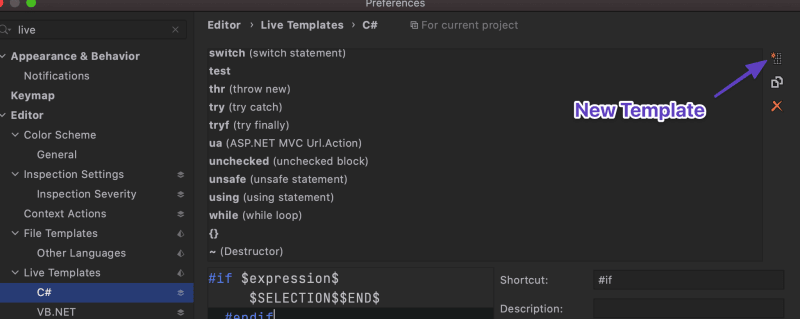
The snippet will look like the following. The spaces before the //end-snippet are essential, as it will make Rider format our comment according to the indent of the current code block.
//begin-snippet: $NAME$
$SELECTION$$END$
  //end-snippet
The settings of our live template are as follows:
- Shortcut:
mdsnippet - Description: Markdown Snippets
- Reformat: Checked
- Shorten Qualified references: Checked
- Availability: Everywhere
- Use in: Surround
We can play around with these settings depending on our development preferences.
Using the surround with shortcut, we can now select mdsnippet as an option with the ability to jump straight to naming our snippet.
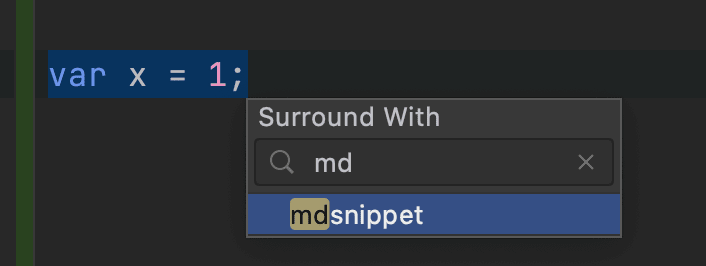
Great! Now, as Rider power users, we can supercharge our documentation writing process.
One more trick for Rider users, we can utilize the Run Anything feature to run mdsnippets from within our IDE. Pressing the ctrl key twice will bring up the Run Anything dialog. Typing dotnet mdnsippets will run the tool and update our target markdown files.

Conclusion
We’ve only scratched the surface of what MarkdownSnippets can do for our OSS project’s documentation. We can mix the tool with our local and cloud build processes to continually update documentation. The tool makes a great pairing with GitHub Actions and other CI systems as well.
To see the project we built in this post, you can visit my GitHub repository. Also, be sure to visit the GitHub repository of MarkdownSnippets to see what other features are available.
Thank you to Simon Cropp for writing this library, and I’m sure it will positively impact our .NET community.