 Photo by
 A general fog of “I hate JavaScript” hovers over the .NET development shops worldwide. While it’s understandable that JavaScript can sometimes be annoying, it has grown significantly recently. One of the areas more ASP.NET Core developers should take note of is Web Components. Web Components allow you to create custom HTML elements for your views that can be one-off or reusable.
With Blazor, ASP.NET Core developers are being exposed to component-based development, but the approach I am going to show you today uses a technique called HTML web components. Unlike Blazor components, these components wrap existing HTML and enhance the contents into something with interactivity. Let’s take a look.
What are HTML Web Components?
Web developer Jim Nielsen wrote a blog post titled “Html Web Components”
where he compares the React component model with what he feels is a better way to write Web Components. His UserAvatar
example might look familiar to Blazor developers.
<UserAvatar
  src="https://example.com/path/to/img.jpg"
  alt="..."
/>
If you’re getting into web components, you might be tempted to write your web components using this approach, but you
might be causing unnecessary issues. What is a UserAvatar? What elements compose this component? How do I style it?
Instead, consider a wrapper component that can enhance the child elements nested within.
<user-avatar>
  <img src="https://example.com/path/to/img.jpg" alt="..." />
</user-avatar>
There are multiple benefits to this approach:
- Since elements already exist in the DOM, they can be processed immediately.
- Team members can see all the elements and work with them accordingly.
- Progressive enhancement. If the Javascript fails on start-up, you still have HTML.
In short, instead of encapsulating HTML within a component, write your HTML web components to augment existing markup. It’s a fantastic technique, and thanks to Jim Nielsen for their blog post. Now, let’s see how we can use this in ASP.NET Core.
The Blazor Counter HTML Web Component
I’ll be recreating Blazor’s counter component to show it doesn’t take much additional effort to write an HTML Web Component. Let’s start with the HTML markup, as it’s the most straightforward implementation part.
<vanilla-counter
    count="0"
    href="@Url.Page("Index", "Count")">
    <h1>Counter</h1>
    <p role="status">
        Current count: <span role="figure">0</span>
    </p>
    <button class="btn btn-primary">
        Click me
    </button>
</vanilla-counter>
Note: All web components must have a - in the name to be valid. This is to avoid conflicts with current and future
HTML elements.
We have an endpoint that will increment the count for us. I am using an endpoint to show that even HTML Web components can connect to the server, but they can be anything you’d like. If you can write it in JavaScript, a web component can do it. Let’s look at the backend implementation.
using Microsoft.AspNetCore.Mvc;
using Microsoft.AspNetCore.Mvc.RazorPages;

namespace WebComponentsSample.Pages;

[IgnoreAntiforgeryToken]
public class IndexModel(ILogger<IndexModel> logger) : PageModel
{
    public void OnGet()
    {
    }

    public IActionResult OnPostCount(int count)
    {
        return Content($"{++count}");
    }
}
OK, let’s write our HTML Web Component. It will be the vanilla-counter element we see above. In a Counter.js file,
add the following code.
export class Counter extends HTMLElement {
    static observedAttributes = ["count", "href"]

    /* lifecycle events */
    connectedCallback() {
        console.log('created');
        this.$button.addEventListener("click", this.increment)
    }

    disconnectedCallback() {
        console.log('destroyed');
        this.$button.removeEventListener("click", this.increment)
    }

    attributeChangedCallback(name, oldValue, newValue) {
        if (name === "count") {
            this.$figure.innerHTML = `${this.#count}`;
        }
    }

    increment = () => {
        this.$button.disabled = true;

        let formData = new URLSearchParams();
        formData.append("count", this.#count);

        fetch(this.#href, {
           method: 'POST',
           headers: {
               'Content-Type': 'application/x-www-form-urlencoded'
           },
           body: formData
        }).then((response) => {
            return response.text();
        }).then((data) => {
            this.#count = parseInt(data);
            this.$button.disabled = false;
            console.log('clicked', this.#count);
        });
    }
    get $button() {
        return this.querySelector("button");
    }

    get $figure() {
        return this.querySelector('[role="figure"]');
    }

    get #count() {
        return parseInt(this.getAttribute("count"));
    }

    set #count(value) {
        this.setAttribute("count", value.toString());
    }

    get #href() {
        return this.getAttribute("href");
    }
}
The essential elements, from top to bottom, of this class include the following:
-
observedAttributesopts into watching specific attributes for theattributeChangedCallbackmethod. When these attributes change in the DOM, the callback gets invoked. - The
connectedCallbackanddisconnectedCallbackmethods are lifecycle events invoked when the element is added and removed from the DOM. This is important for dynamic element creation as you want to unregister any event listeners to avoid memory leaks. -
incrementis our logic, which calls the ASP.NET Core endpoint and returns the incremented value. - The rest of the class are helper getters and setters.
We need to change our site.js file to import our Counter.js class and register the custom element.
import {Counter} from "./Counter.js";

window.customElements.define("vanilla-counter", Counter);
You’ll also want to change the _Layout.cshtml file to make sure the site.js file is loaded as a module, which will
allow us to use the import keyword.
<script src="~/js/site.js"
        type="module"
        asp-append-version="true">
</script>
Let’s see what it looks like in the browser.
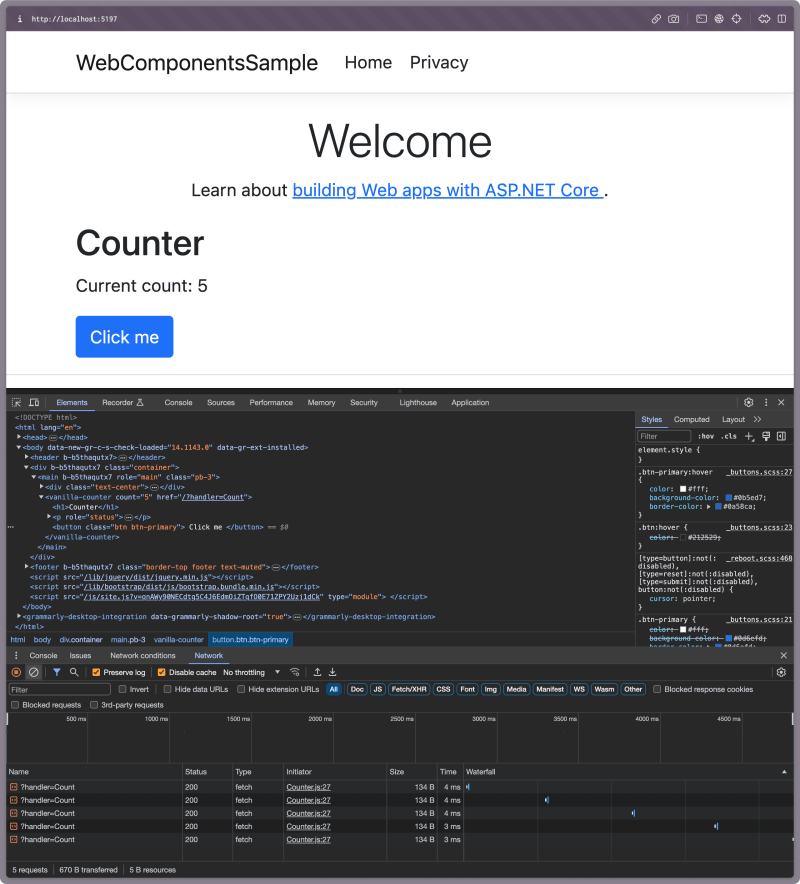
Pretty cool. You can also try the HTML Web Component sample on my GitHub repository. In the screenshot you can see the HTML component is triggering fetch requests to our ASP.NET Core backend.
Conclusion
The web platform has come a long way, and this approach could be helpful to folks building web experiences. The process of building components is relatively straightforward, works with any technology stack, and has advantages regarding progressive enhancement.
I want to thank Jim Nielsen again for the excellent blog post and inspiration for this post. As always, thanks for reading, and cheers. :)


