 Photo by
 There are several uses for neural networks, but the one that’s most immediately understandable for folks centers around image manipulation. One of my favorite examples is style transfer onto existing images. For example, make your avatar look like a mosaic or take after pointillist artist Georges Seurat. If you search modern app stores, you’ll likely find many applications to style your photos using sophisticated neural network models.
In this post, we’ll explore the Open Neural Network Exchange (ONNX) format, how to use the ONNX runtime in your applications, and what it takes to preprocess and post-process images using ImageSharp to make results shareable.
Let’s get started.
Note: I’m not a machine-learning expert, so this post explains concepts to the best of my ability.
What Is ONNX?
If you have a shallow fascination with machine learning, you’ve likely also heard about many of the tools used in the space: TensorFlow, PyTorch, Keras, Matlab, CoreML, and many more. The creators of these tools tailor them for specific use cases and environments, which is excellent, but they also limit when and where you can use the trained models generated from using them. ONNX is a format used to promote interoperability amongst the AI tool community:
Many people are working on great tools, but developers are often locked in to one framework or ecosystem. ONNX is the first step in enabling more of these tools to work together by allowing them to share models. –ONNX
As a developer, you can think of the ONNX format like the promise of JAVA’s virtual machine, but instead, train your models once and then deploy them anywhere. Additionally, the format seems to be gaining support from large partner companies such as AMD, ARM, AWS, NVidia, Microsoft, Yandex, and many more. That’s great for building a community of collaboration and of sharing ideas.
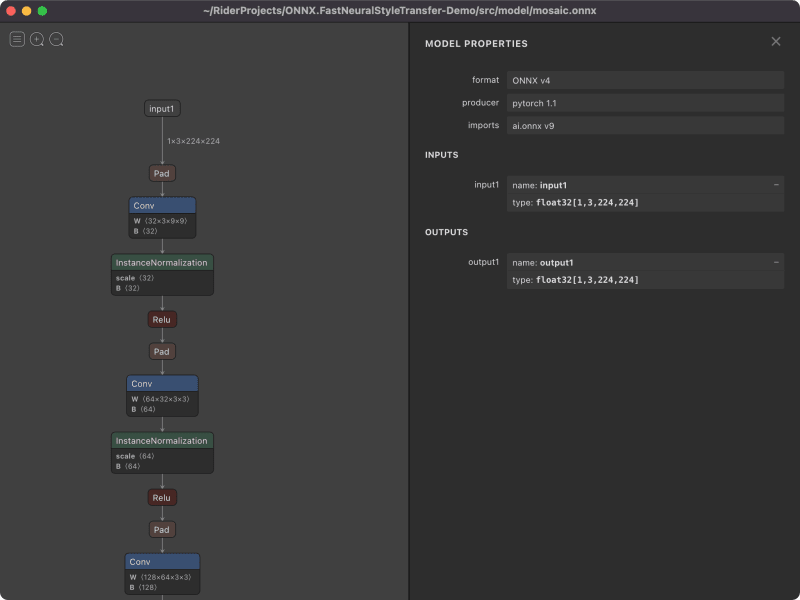
Having a standard format also makes it easier for the community to build tooling to understand pre-trained models. For example, a tool I used to help me decipher the models I’m using in this post is Netron. Netron allows you to import any .onnx model and see the nodes that comprise the model. It also informs you about the expected inputs, their names, and the final output of the model.
For .NET users, there are native libraries that help you run any ONNX model directly in your applications: Microsoft.ML.OnnxRuntime, which you’ll see later in this post.
Finally, the fine folks working on ONNX also have a model zoo. It’s a set of pre-trained models for you to play around with, and we’ll be doing just that. They are limited in what they can do, but they show the power of what you can do with the .onnx format.
Let’s Run Some Models
Get the code from here: Style Transfer GitHub Repository.
You’ll need to start by creating a console application using .NET 6. Once you have a new console application, you’ll need to install two necessary NuGet packages: Microsoft.ML.OnnxRuntime and SixLabors.ImageSharp. The first package will let you load the .onnx format, while the second is an image library that will allow you to process the images to and from the input/output formats.
Note: macOS users might need to use homebrew to install the onnxruntime package, since there is currently a bug effecting macOS users with the NuGet package.
You’ll now need to download the style transfer models from the ONNX zoo. You can download one or all of them. The code in this post is interchangeable as all the models share the same input and output formats. As a warning, different models will have other requirements for inputs, so you will need to use Netron to see what those are and likely read any documentation that comes with the model.
In the case of the Fast Neural Style Transfer models, the required inputs are as follows:
- The pixel information in
floattype, with images being a maximum size of 224px x 224 px - Three channels of pixel information (Red, Green, Blue)
- Height and Width
The resulting output will be in the same shape.
Like most models, you’ll need first need to preprocess any image you want to pass through the model. In this case, we need to resize our source image. For this demo, I’ve used a picture of this cat.

The first step is to load the image into memory.
var image = Image.Load<Rgb24>(imageFilePath);
Once the image is in memory, you’ll need to resize the image to a 224px square image. The process of resizing is straightforward using the ImageSharp API. I’ve decided to clone the image to keep the original in-memory image intact. I’m also cropping the image if the ratio isn’t originally square.
var image = original.Clone(ctx =>
{
    ctx.Resize(new ResizeOptions
    {
        Size = new Size(224, 224),
        Mode = ResizeMode.Crop
    });
});
The next step is to load the image information into a DenseTensor<float> instance. Note, the model expects height, then width.
var input = new DenseTensor<float>(new[] {1, Channels, Height, Width});
for (var y = 0; y < image.Height; y++)
{
    var pixelSpan = image.GetPixelRowSpan(y);
    for (var x = 0; x < image.Width; x++)
    {
        input[0, 0, y, x] = pixelSpan[x].R;
        input[0, 1, y, x] = pixelSpan[x].G;
        input[0, 2, y, x] = pixelSpan[x].B;
    }
}
Great! Now you’re ready to load your model and run it on the input image. In this case, I’ve decided to use the mosaic model, choose the one you think is most exciting. Note, the input is named input1, which is very important..
using var session = new InferenceSession($@"./model/mosaic.onnx");
using IDisposableReadOnlyCollection<DisposableNamedOnnxValue> results
    = session.Run(new[]
    {
        NamedOnnxValue.CreateFromTensor("input1", input)
    });
You’re almost there. Now that you have a result from the model, you need to process the Tensor<float> type back into an image using ImageSharp.
if (results.FirstOrDefault()?.Value is not Tensor<float> output)
    throw new ApplicationException("Unable to process image");

var result = new Image<Rgb24>(Width, Height);
for (var y = 0; y < Height; y++)
{
    for (var x = 0; x < Width; x++)
    {
        result[x, y] = new Rgb24(
            (byte) Math.Clamp(output[0, 0, y, x], 0, 255),
            (byte) Math.Clamp(output[0, 1, y, x], 0, 255),
            (byte) Math.Clamp(output[0, 2, y, x], 0, 255)
        );
    }
}
The model can generate float values slightly above 255 and below 0. Therefore, you need to limit the values using Math.Clamp. Now that the code is complete, you can save the image to disk and look at it.
result.Save($@"./output/mosaic_cat.png");
In my sample code, I’ve written the code to allow you to test all the models at once.
// Program.cs
using ONNX.FastNeuralStyleTransfer;
using SixLabors.ImageSharp;
using SixLabors.ImageSharp.Formats;
using SixLabors.ImageSharp.Formats.Jpeg;
using SixLabors.ImageSharp.Formats.Png;
using SixLabors.ImageSharp.PixelFormats;

const string filename = "cat.png";
const string imageFilePath = @$"./input/{filename}";
Directory.CreateDirectory("output");

var styles = new[]
{
    (name: "mosaic", model: "mosaic.onnx"),
    (name: "candy", model: "candy-9.onnx"),
    (name: "pointilism", model: "pointilism-9.onnx"),
    (name: "rain-princess", model: "rain-princess-9.onnx"),
    (name: "udnie", model: "udnie-9.onnx"),
};

var image = Image.Load<Rgb24>(imageFilePath);
foreach (var (name, model) in styles) {
    var result = StyleTransfer.Process(image, model);

    IImageEncoder encoder = Path.GetExtension(imageFilePath) switch {
        ".png" => new PngEncoder(),
        ".jpg" => new JpegEncoder(),
        _ => throw new Exception()
    };

    result.Save($@"./output/{name}_{filename}", encoder);
}
The StyleTransfer class has the following implementation.
using Microsoft.ML.OnnxRuntime;
using Microsoft.ML.OnnxRuntime.Tensors;
using SixLabors.ImageSharp;
using SixLabors.ImageSharp.PixelFormats;
using SixLabors.ImageSharp.Processing;

namespace ONNX.FastNeuralStyleTransfer;

public static class StyleTransfer
{
    const int Width = 224;
    const int Height = 224;
    const int Channels = 3;

    public static Image<Rgb24> Process(Image<Rgb24> original, string model)
    {
        var image = original.Clone(ctx =>
        {
            ctx.Resize(new ResizeOptions
            {
                Size = new Size(Width, Height),
                Mode = ResizeMode.Crop
            });
        });

        var input = new DenseTensor<float>(new[] {1, Channels, Height, Width});
        for (var y = 0; y < image.Height; y++)
        {
            var pixelSpan = image.GetPixelRowSpan(y);
            for (var x = 0; x < image.Width; x++)
            {
                input[0, 0, y, x] = pixelSpan[x].R;
                input[0, 1, y, x] = pixelSpan[x].G;
                input[0, 2, y, x] = pixelSpan[x].B;
            }
        }

        using var session = new InferenceSession($@"./model/{model}");
        using IDisposableReadOnlyCollection<DisposableNamedOnnxValue> results
            = session.Run(new[]
            {
                NamedOnnxValue.CreateFromTensor("input1", input)
            });

        if (results.FirstOrDefault()?.Value is not Tensor<float> output)
            throw new ApplicationException("Unable to process image");

        var result = new Image<Rgb24>(Width, Height);
        for (var y = 0; y < Height; y++)
        {
            for (var x = 0; x < Width; x++)
            {
                result[x, y] = new Rgb24(
                    (byte) Math.Clamp(output[0, 0, y, x], 0, 255),
                    (byte) Math.Clamp(output[0, 1, y, x], 0, 255),
                    (byte) Math.Clamp(output[0, 2, y, x], 0, 255)
                );
            }
        }

        return result;
    }
}
Cool! But now, let’s see what the cat looks like using each style transfer.

Key Takeaways and Conclusion
ONNX is an excellent format for getting started, and tools like Netron make it straightforward to understand input and output requirements. Additionally, great OSS tools like ImageSharp make image manipulation a breeze.
One drawback about models, in general, is their inflexibility. Pretrained models can only operate within expected limits. If you’re coming from a photo-editing background, you might find the limitations frustrating, the preprocessing tedious, and the post-processing baffling. The experience you have will depend mostly on your understanding of the model. Luckily, as you learn more, it’ll get easier.
Please download the sample project if you’re interested in using your images with the ONNX pre-trained models. You can find the complete project on my GitHub repository.
Special Thanks
I want to thank Gerardo Lijs for setting me down the right path. While this post’s final code looks quite different from his initial code, his sample helped me unblock myself and get to my current understanding.


