Photo by
 Creative folks come in many different shapes and disciplines. Some people may be adept at creating visual art, while others are great at problem-solving. The internet has made it possible for all of us to combine our best skills into a more exceptional user experience.
In a previous post, I showed how I was experimenting with motion graphics. At the same time, I’ve been exploring Xamarin.Forms for cross-platform mobile development. To my excitement, there is a way to combine my love for animation with development using Lottie, Xamarin.Forms, and .NET.
In this post, we will see how we can take an animated motion graphic and use it in our mobile development.
What Is Lottie?
Lottie is a motion graphic format that allows designers to share animations across multiple platforms.
A Lottie is a JSON-based animation file format that enables designers to ship animations on any platform as easily as shipping static assets. They are small files that work on any device and can scale up or down without pixelation. LottieFiles.com
Many motion graphic designers will use professional tools like Adobe After Effects and Figma, to create visually dynamic graphics. The Lottie format is a simple, efficient, and effective way to enhance our developer experiences.
Here is an example of a Lottie animation by Mikhail Volshin.
Getting Started With Xamarin.Forms And JetBrains Rider
Before diving into Lottie, we first need to make sure we have all the prerequisites on our development environment. If you are already an experienced Xamarin developer, please feel free to skip this section. Note, this setup is for macOS users.
The first step is to make sure we have all the Xamarin tooling installed on our machine. Under the JetBrains Rider preferences, we can go to Environment.
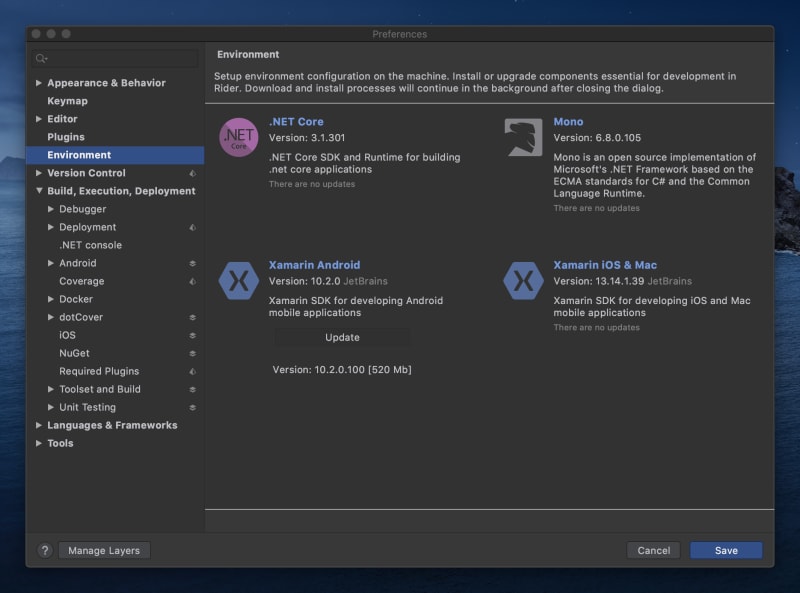
Once there, we want to install all the Xamarin environments. I usually install everything on this screen.
The next step is to find the Android category in the preferences tab. From here, we want to install our Android and build tools. As of writing this post, the Android API 30 tools do not work with Xamarin.Forms.
First, we’ll need to navigate to Android>SDK Components and we want to go to SDK Tools.

Under this tab, we can check Show Package Details on the bottom right-hand side. From here, we want to install the Android SDK Build-Tools 29.0.3. Again, version 30 doesn’t work with Xamarin.Forms due to an APK Signer issue, which prevents the installation of our mobile application.

We also want to install XCode at this point to be able to run the iOS simulator.
After installing the Android SDK and the iOS tools, we should be ready to work with Xamarin.Forms. JetBrains Rider will also allow us to create virtual devices, so take the time to use the ADV manager for Android and set up some new phones and tablets. iOS devices work, so we don’t have to do anything there.
Starting A New Appliction
From the JetBrains Rider new solution screen, we want to start a new Xamarin.Forms application. We can select the Android and iOS targets we want and create the solution. I normally choose the latest version of iOS available, and the second highest version of Android. As of writing this post, that is iOS 13.2 and Android 11.

The next step is to add the Lottie package from NuGet to our Xamarin.Forms project, the one that has our XAML files of App.Xaml and MainPage.xaml.
$> dotnet add package Com.Airbnb.Xamarin.Forms.Lottie
Before continuing, we want to find a Lottie animation, which we can do by going to LottieFiles.com or by working with our favorite designer and having them export the animation in the Lottie format.
In this demo, we’re using a familiar like animation signified by an exploding star.
Adding Lottie Files To Xamarin Projects
Android and iOS applications store their resources differently, so this next step is critical. We will need to add the Lottie file to both the iOS project and the Android project.
For the Android project, we’ll put the Lottie file, star.json under the Assets folder. We also need to change the properties of this file to be an AndroidAsset. We can do that by right-clicking the JSON file, and setting the Build action to AndroidAsset.

For the iOS project, we’ll put the Lottie file, star.json at the root of our project with a Build action of BundleAsset.

Adding the Lottie file will be essential when we reference the file by name later.
The XAML
We added the NuGet package earlier when creating the solution. We now need to update our XAML file to bring in the bindings that will allow us to reference Lottie animations.
<?xml version="1.0" encoding="utf-8" ?>
<ContentPage xmlns="http://xamarin.com/schemas/2014/forms"
             xmlns:x="http://schemas.microsoft.com/winfx/2009/xaml"
             xmlns:local="clr-namespace:PlayingWithAnimations"
             xmlns:forms="clr-namespace:Lottie.Forms;assembly=Lottie.Forms"
             x:Class="PlayingWithAnimations.MainPage">

    <Grid>
        <Grid.RowDefinitions>
            <RowDefinition Height="*"></RowDefinition>
            <RowDefinition Height="*"></RowDefinition>
        </Grid.RowDefinitions>
        <Grid.ColumnDefinitions>
            <ColumnDefinition Width="*"></ColumnDefinition>
        </Grid.ColumnDefinitions>

        <forms:AnimationView
             Grid.Row="0"
             x:Name="animationView"
             Animation="star.json"
             IsPlaying="false"
             Loop="false"
             VerticalOptions="FillAndExpand"
             OnClick="Clicked"
             OnFinish="Finished"
             HorizontalOptions="FillAndExpand" />
        <Label
           Grid.Row="1"
           x:Name="status"
           Text = "OFF"
           FontSize="100"
           VerticalOptions="CenterAndExpand"
           HorizontalOptions="CenterAndExpand">
        </Label>
    </Grid>

</ContentPage>
Through trial and error, I found that the Grid layout worked best, as it kept height and width consistent, but folks should experiment and see what works best for them.
Note that we have an AnimationView element in our view, which references our star.json Lottie animation. From here, we can set other attributes like Loop, IsPlaying, and event handlers.
The Animation Code
The C# code will allow us to toggle our animation by clicking on it. Additionally, we will display a text value of ON or OFF depending on our animation’s visual state.
public partial class MainPage : ContentPage
{
    public bool IsOnOff { get; set; }

    public MainPage()
    {
        InitializeComponent();

        On<Xamarin.Forms.PlatformConfiguration.iOS>().SetUseSafeArea(true);
    }

    private void Clicked(object sender, EventArgs e)
    {
        if (!animationView.IsPlaying)
        {
            if (IsOnOff)
            {
                animationView.PlayFrameSegment(1, 2);
                status.Text = "OFF";
            }
            else
            {
                animationView.PlayFrameSegment(1, 60);
                status.Text = "ON";
            }

            animationView.Progress = 0;
            IsOnOff = !IsOnOff;
        }
    }

    private void Finished(object sender, EventArgs e)
    {
        animationView.IsPlaying = false;
    }
}
The code here uses PlayFrameSegment and gives us fine-grained control over which frames we want to play. The library supports other methods, and even allows us to run animations backward, but through testing, found reverse play buggy.
The Demo
For folks that want to run this sample locally, I have pushed it to GitHub. Running our example, we can see the animation runs, and we can toggle the animation on and off.
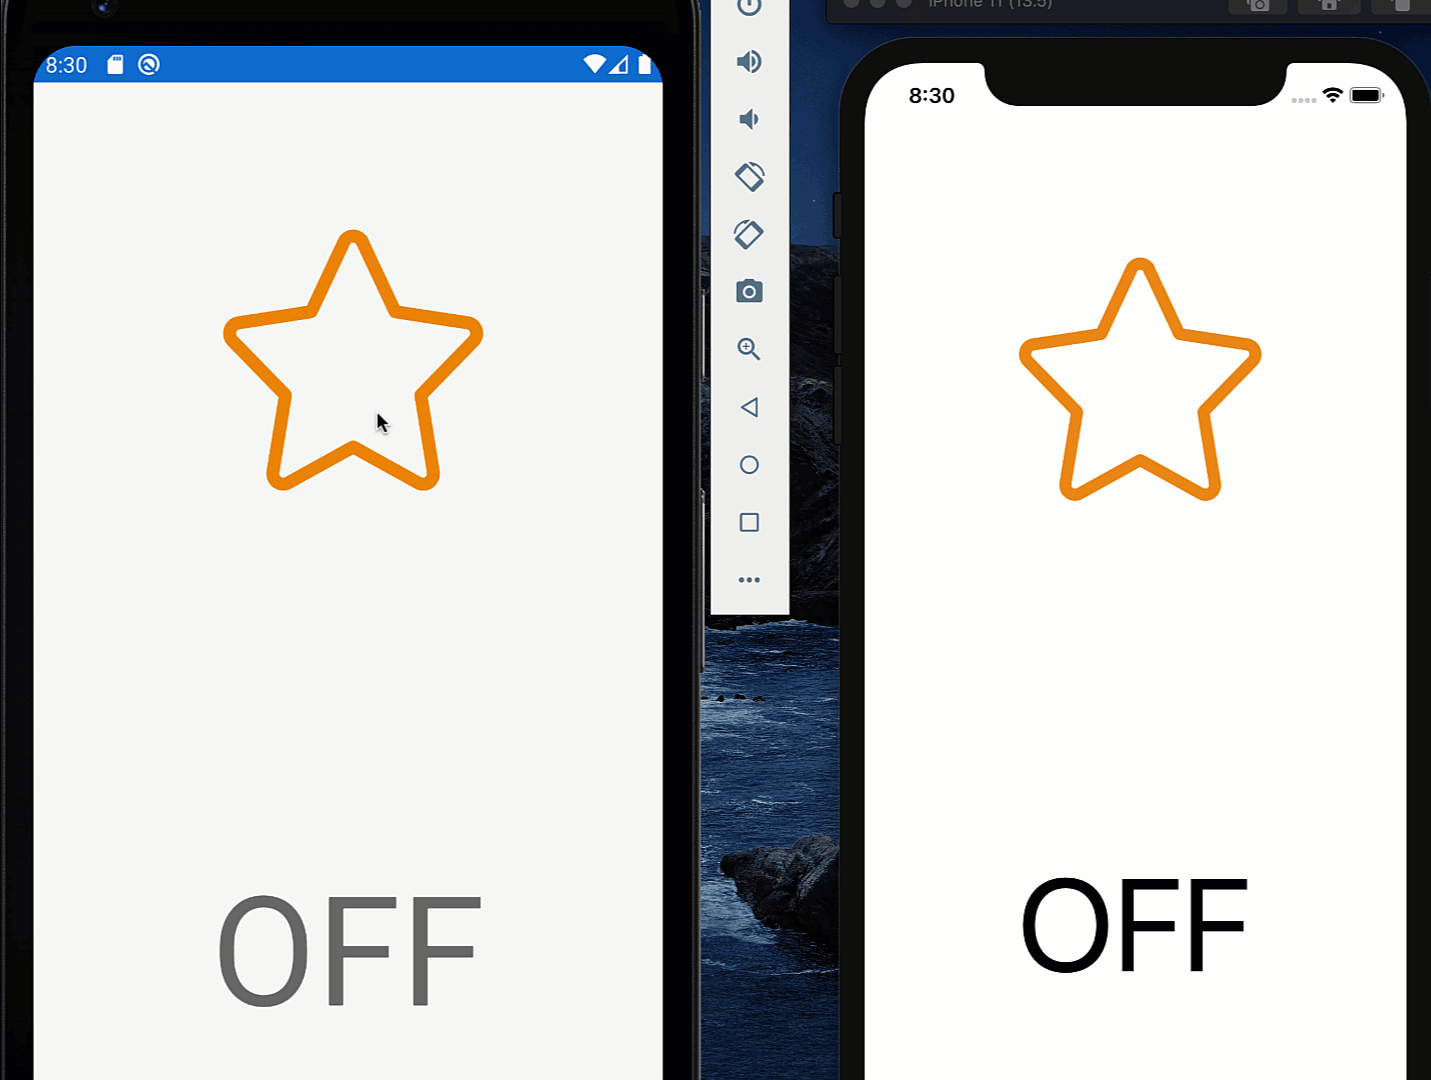
Pretty cool! We have a stunning animated element, without the complexity of needing to animation dozens of individual visual items.
Conclusion
Lottie allows us to use professional-grade tools to build stunning animations to use in our mobile application development. Our application understands that these animations as elements, so we can subscribe to all the same events and interactions as other elements. I hope you found this post useful and that you’ll upgrade your mobile applications.