Photo by
 F# is the .NET language’s premier functional language. The syntax can be more concise than C#, which can arguably reduce overall errors. Regardless, we should still be writing tests as all good programmers should. In this post, we’ll be walking through writing a Calculator module, and writing some test assertions. When finished, we’ll have a module, a type, and a set of passing tests.
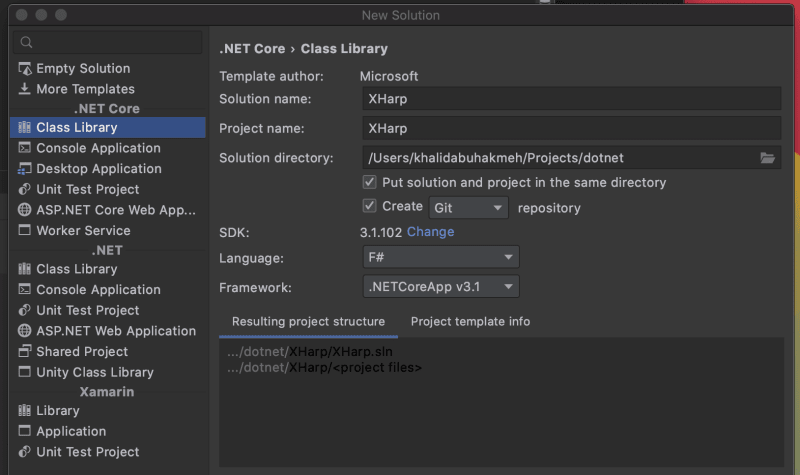
We first need to create a new F# project. In our case, since we’ll be purely writing tests, we can choose to start with a standard class library. We’ll be using .NET Core 3.1.
Next, let’s remove all the .fs files found in the class library, and add a Math.fs file. This file will have our Calculator module with functions add, subtract, multiply, and divide.
module Math

module Calculator =
    let add x y  =
        x + y
    let subtract x y =
        x - y
    let multiply x y =
        x * y
    let divide x y =
        (decimal)x/(decimal)y
In F#, a module is a grouping mechanism for values, types, and functions.
Grouping code in modules helps keep related code together and helps avoid name conflicts in your program. –Microsoft
In our case, we are grouping out mathematical methods. Let’s start writing some tests!
The next step is to create a Tests.fs file. It is essential that we order the new file underneath our Math.fs file or else our library will not build.

We will need to reference the unit testing library if we haven’t already done so. In this example, we are using XUnit.
> dotnet add package xunit
Sharing libraries across languages is one of the most significant advantages of the .NET ecosystem. While XUnit is written primarily in C#, many F# authors use it to test their F# libraries.
Our next step is to import our Math module. The top of our new file should look like the following. The namespace may vary based on what we chose at the beginning of this tutorial.
namespace Xharp

open Xunit
open Xunit.Abstractions
open Math
We have pulled in references to our module, along with references to XUnit. Our next step will be to create a Tests type. Types are different than modules. They can still group values, methods, and functions but more represent the .NET runtimes idea of an object.
The .NET Framework is the source of object types, interface types, delegate types, and others. You can define your own object types just as you can in any other .NET language. –Microsoft
Here is what the entire Tests file looks like after creating our new type.
namespace Xharp

open Xunit
open Xunit.Abstractions
open Math

type Tests(output:ITestOutputHelper) =
    let write result =
        output.WriteLine (sprintf "The actual result was %O" result)

    [<Fact>]
    let add_5_to_3_should_be_8() =
        let result = Calculator.add 5 3
        write result
        Assert.Equal(8, result)

    [<Fact>]
    let minus_3_from_5_should_be_2() =
        let result = Calculator.subtract 5 3
        write result
        Assert.Equal(2, result)

    [<Fact>]
    let multiply_3_and_5_should_be_15() =
        let result = Calculator.multiply 3 5
        write result
        Assert.Equal(15, result)

    [<Fact>]
    let divide_8_by_2_should_be_4() =
        let result = Calculator.divide 8 2
        write result
        Assert.Equal((decimal)4, result)
So why did we choose a type instead of a module? In our case, we wanted to pass XUnits ITestOutputHelper to our instance of running tests. An instance of the ITestOutputHelper is created and passed into the constructor of our Tests type, which allows us to write out the results to our test runner.
We also took the liberty of encapsulating the ITestOutputHelper into a reuseable write method.
let write result =
    output.WriteLine (sprintf "The actual result was %O" result)
When we run our tests, we can see that they all pass, and looking in our IDEs test runner output, we can see the runtime value.
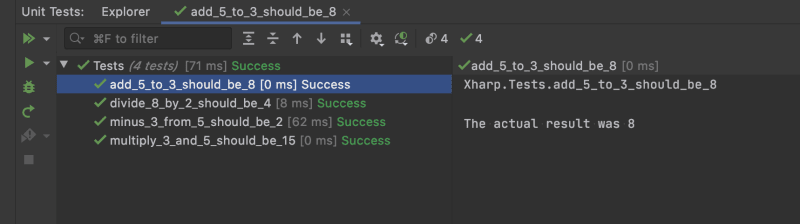
All our tests pass because we get the expected value, but using ITestOutputHelper can help up diagnose issues when we don’t have access to the debugger.
For bonus points, we can actually use a feature of F# that allows for string literal method names.
    [<Fact>]
    let ``add 5 to 3 should be 8``() =
        let result = Calculator.add 5 3
        write result
        Assert.Equal(8, result)
When we execute our test, the resulting output shows. Note the lack of underscores.
Xharp.Tests.add 5 to 3 should be 8

The actual result was 8
Conclusion
There we have it! A getting started guide to writing unit tests with XUnit and F#. As we can see, the conciseness of F# is aesthetically appealing and easy to use. We also have the advantage of leveraging the existing tools found in the .NET ecosystem.
I hope you found this post interesting, and please leave a comment below.